
Since the general availability release of in-app notifications this Spring, I’ve been seeing more and more applications for this feature. However, my initial impression was that for non-developers like myself in-app notifications would require development work to implement. Not that this is a showstopper but for many organizations, either having a developer assigned to Dynamics 365 or acquiring time from an existing one can sometimes be a challenge.
I recently dove into Notifications and am excited to have my eyes opened as to how we can easily enable and create in-app notifications for Dynamics 365 using an awesome plug-in for XRMToolBox authored by Ivan Ficko. In this blog post I won’t spend a lot of time treading on aspects of the feature that Microsoft has well documented online. What I will memorialize, though, is how to:
- Enable the XRMToolBox plug-in
- Enable the in-app notification feature
- Author Power Automate Flow notifications with the plug-in
- Ensure application users can see and interact with notifications
Enable the XRMToolBox plug-in
For the purposes of this explanation, I will assume that you are already an XRMToolBox user. If you’re not, you will need to download the tool which is free, but I HIGHLY recommend making a donation. Another assumption is that you have already established the connection to the environment that you want to work with.
From the XRMToolBox app, select Tool Library from the Configuration menu.

This plug-in library contains a ton of utilities for D365 that you can add to your active library but don’t get distracted by all the other options. Do a search for “in-app” and select the tool, then click Install from the ribbon.

You can now click on the plug-in to open it up. Step one done!
Enable the in-app notification feature
This feature is enabled granularly by model-driven app. Initially, the enablement was all programmatic. Yikes! However, since general release you can now enable it within the maker portal via a solution containing the model-driven app. Instructions for that method are here.
What I want to highlight, though, is the convenient two-click activation from within Ivan’s plug-in.
At the top of the window is a selector to identify a model-driven app within the environment you’re logged into.
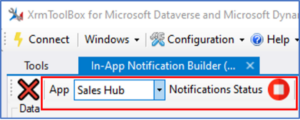
Click the carat and select the app you want to enable, then simply click the red notification status icon and confirm that you want to enable the feature. Ok, so that may end up costing you four clicks by the time you’re done but they’re quick ones!
Author notifications with the plug-in
Ok, now comes the fun part! If you want to create an in-app notification using Flow, this tool will give you most of what you need and you can cut-and-paste it into your Flow. I’ll provide a simple example to demonstrate the process and explain what each component of the editor does. If you’re a developer (thinking you probably wouldn’t reading this), then you can also use this tool to get C# and JavaScript code auto produced.
Let’s use a simple example of a case being assigned to a user and highlight each of the tool components using the guide below.
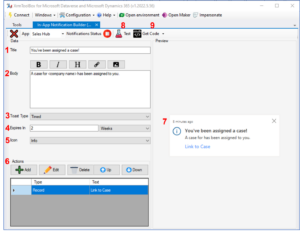
1. The Title is the bold header in the notification card.
2. The Body is the core of the message and the editor allow you to do basic text formatting and insert links and images here.
3. The Toast Type is either timed or hidden. Timed simply means that it will splash on the user’s screen for a few seconds before retreating to the notification center. Hidden will not splash first. The notification bell icon shows the count of new notifications. When you open the notification center the count is cleared.

4. The expiration setting is nice because it technically gets converted to seconds and with this editor you can specify how long the message will remain, if not dismissed, and not have to do that conversion.
5. While you can add custom icons for special notifications you may create, the primary ones are already provided from this option set list.

6. The actions section corresponds to the blue links at the bottom of the notification. You can add one or more links to the notification depending on the intent and what would be useful. In this example, I’m providing a direct link to the case for the user to click. If needed, I could have also provided one to the account or to the contact identified on the case.
7. Perhaps my favorite feature of the tool is the preview window on the right. Here, you can see in real-time exactly what your notification will look like without having to wait until you’ve run a test and checked in the model-driven app.
8. Speaking of testing, this action will allow you to pick a D365 user within the org you’re connected to and send this draft notification to them without needing a trigger. How great is that?! So, you can select yourself, if applicable, run the test and see the notification in the model-driven app just as if it was a real event. This is also a great way to test delivery once you’ve enabled security which we’ll cover below.
9. Last but not least is the Get Code icon which allows you to select from C#, JavaScript, or Power Automate (Flow). This tutorial is for us no-coders so we will select the Power Automate option which presents us with this dialog:
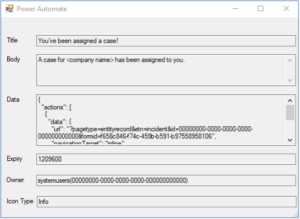
These are the values that we will use to paste into our Flow as a starting point. Let me show you where each one goes for this example.
To use this method and author the notification with Power Automate Flow, we need to create a solution in the environment you want it to run in and add a new Flow to the solution.
In our case, we’re going to use three simple steps. The trigger will be the case getting assigned, so we’ll use the Dataverse connector and edit the “When a row is modified” trigger.
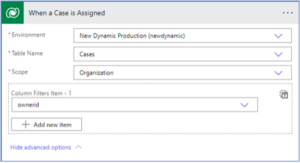
We select the environment, our Case table that we’re triggering from, set the scope, and filter by the record owner as our change to monitor. This way when the case comes in automatically or is created, if it is re-assigned to another person, the notification will be created.
Next we need to get the company name for inclusion in our message body. We left a placeholder for this in the plug-in tool which wasn’t necessary. It was just a reminder but you may have noticed that by putting it in brackets, the preview excluded it.
For this we use the “Get a row by ID” operation from the Dataverse connector.
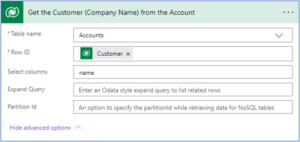
Here we simply want to get the actual name instead of the GUID (an ongoing annoyance with Flow for many) since this is a lookup field on the case table.
Lastly, we’ll use the “Add a new row” operation to create the notification. As presumed, Notification is its own table in Dataverse so there are some specific attributes that Flow asks the author to identify. This is where the “Get Code” from the XRMToolBox plug-in comes in handy.
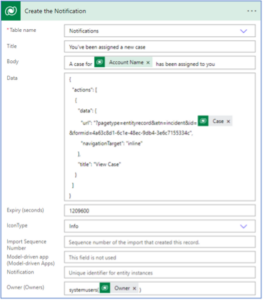
In the above image, I’ve simply selected the Notification table, then pasted from my dialog the title, body, data, expiry, icon type, and owner.
There were three places where I had to modify the data to add the specific dynamic value from the Flow. The account name came from the “Get a row by ID” operation. The other two if you noticed (and I’m sure you did) were generic GUIDs in the placeholder values that I simply replaced with the dynamic content—one being the Case referenced with the initial trigger and the other being the owner of the same case.
I created a test case record, re-assigned it to myself and bingo- in less than a minute the notification popped up.
Ensure application users can see and interact with notifications
One big item to not forget now that you’ve mastered the process of creating notifications is making sure that your intended audience can actually receive them!
The in-app notification feature uses three tables and a user needs to have the correct security roles to receive notifications. How you chose to apply these privileges is up to your organization’s practices, but for a user to receive notifications they must have the following privileges on at least one of their assigned security roles. All three of these tables are found under the Custom Entities tab on the security role editor.
- Read privilege on the Notification table
- Create, Read, Write, and Append privileges on the Model-Driven App User Setting
- Read and AppendTo privileges on Setting Definition table
Conclusion
Hopefully, if you’re a functional admin, power user, or consultant, you are encouraged by the ease that in-app notifications can be created in the way I’ve described.
I realize this was a pretty basic example and you can add a lot of complexity to both the triggering of the notification as well as the authoring of the notification content. I purposely left out a lot of advanced options, but my intent was to get you started quickly.
I authored this notification Flow and had it working in about a quarter of the time it took me to write this blog. That either tells you it’s as easy as described or that I’m a terribly slow writer!
During my research for this article, I came across a really well-done video that explains what I’ve described and more published by a perky Dynamics 365 MVP who goes by the handle Benitez Here. It’s also worth a watch.


